This week I have been going through my large amount of stamping/scrapbooking stuff. Really, I should say gargantuan amount of stuff because once I gathered all of it into one area that is what I ended up with. I asked my husband how all of that fit into my craft room and he said I am just good at making a lot of stuff look neat in small spaces and you can’t see how much is there. At this point I am not sure whether that is a gift or a curse, however it is being remedied by this tidying event so no worries there. 😏 Anyway there has been much to process this week…stuff and emotions attached to the stuff. It has been eyeopening in many good ways as well as a few challenges, but with the Lord’s help I am conquering the piles of stuff and emotions.
Once I finish this category I will be half way through my Komono main category which is really exciting! I look forward to being finished with the discarding process and then moving onto the organizing phase which is where my house will begin to take shape once again and that is a happy thought indeed!
Well, now that I have updated you on the tidying even, now it is time for the real fun…recent jewelry projects! I have five pieces of jewelry to share that I have made over the last several weeks and there are several firsts that have taken place for me in the process of creating theses pieces.
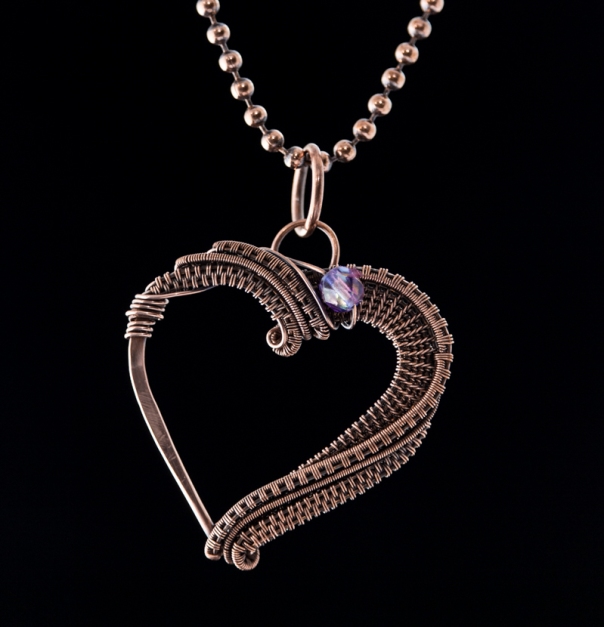
The first one I have to share is a necklace that I made following the Hearts in Asymmetry Pendant tutorial by Nicole Hanna. This piece was pretty straight forward and fun to make. I really like the way the hammered larger gauge wire looks with the weaves and it inspires me to try my own version of that in the future. I am really pleased with how this piece turned out, but I didn’t have any new experiences in creating this piece like I did with the other pieces, so I thought I would share it first.
Here is a picture of it…

The second piece I have to share is a bracelet that I made following a tutorial by Margie Mugavero (MaxxBelle Creations) called Twisted Braid Copper Bracelet. This was the first tutorial I did by this artist. I found the tutorial to be pretty straight forward and it was broken down into helpful sections. This was my first experience in working with eleven base wires at one time. I found it to be quite a challenge to manage at first, but eventually I got the hang of it. I did find that working with so many base wires at one time really slowed down how quickly I could weave, and the process got a little boring after a while. I actually stopped working on this for a while and created the heart necklace that I have already shared and another necklace that I will be sharing next. I found it to be helpful to break up this project and work on something else for a while. I think that is something that is common in the creative process with most people, but it isn’t something that I like to do in general because in the past I haven’t finished projects that I did that with. I don’t think that will be the case with jewelry in general, but if it is, then I probably really didn’t want to do the unfinished piece in the first place. I am coming to the conclusion that my creative time is too valuable to be working on things I don’t enjoy…unless someone is paying me a bunch of money for a custom piece, and even then it won’t be too often. In the future if I make this bracelet again, I will use some techniques and tips that I learned from my Wire Weaving Bracelets: Basics and Beyond class by Sarah Thompson at craftsy.com and I think the bracelet will go a lot quicker and smoother.
Here are some pictures of the bracelet…


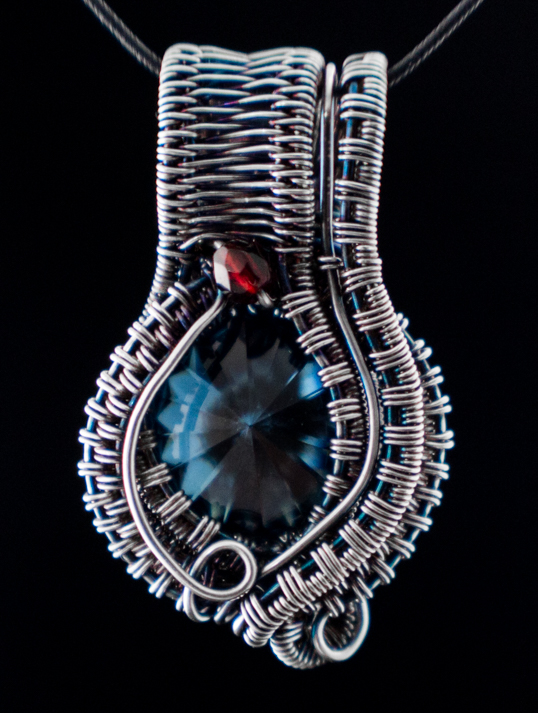
The third piece I have to share is a necklace made following the Faery’s Tear Pendant tutorial by Nicole Hanna. I have to say this is my favorite tutorial that I have done. I have made three of these so far and I wear the first one most every day. The first two I made using copper wire, but this one I made using fine silver wire. It was my first time working with fine silver or any precious metal, so I wanted to use a tutorial that I was comfortable with. It wasn’t as intimidating to work with the silver as I thought it would be…probably because I had a tutorial to follow. I am sure when I try to make a piece on my own I will need more courage to conquer the fear of messing it up. 🙂 In working with the fine silver wire, I found it to be quite soft which made it interesting with weaving. I tend to pull things pretty snug when working with my copper wire and I jerked too hard a few times with the silver until I found a good tension to work with. I picked dark colored beads to work with because of the brightness of the silver wire, and I was very happy with the results. I had planned all along to oxidize this piece and I was unprepared for how the fine silver would oxidize. First it took so much longer than my copper wire pieces to oxidize, then when it did fully oxidize it looked like this…

Isn’t that crazy! The colors look so pretty. I have seen other people post pictures of things similar to this, but I thought they might be editing in the color effects. This shows me they were not adding color effect…that is just what fine silver does. It may be the same with argentium silver and sterling silver too, but I haven’t worked with those yet. I want to make a piece with the intention of not polishing away the darkness and colors of the wire, but I will need to choose lighter beads to do that.
Here are some pictures after it has been polished to bring out the highlights…

I am glad that polishing helped my darker beads show up better. I was a little concerned for a while, but it turned out just fine and I have more experience now that will help me chose beads to match the wire better in the future. I really like the way the colors still show through after I polished it in certain areas. It gives the piece a more rich feel and the blue in the wire brings out the blue crystal bead in the center.
Something I found interesting in making another Faery’s Tear Pendant is how different it turned out from my first piece.
Here is a picture of both pieces together…
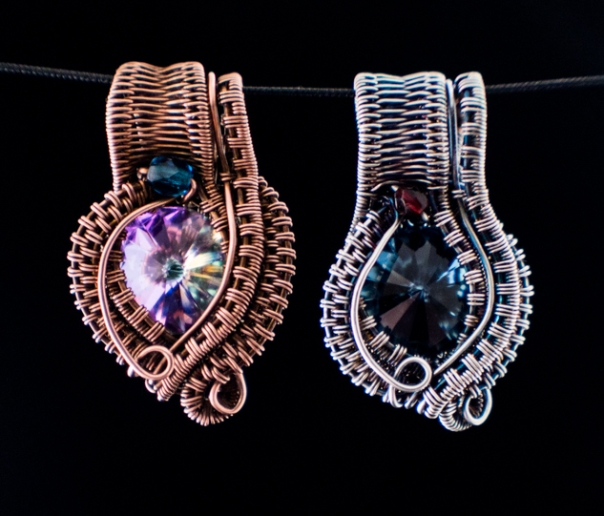
I think they are both lovely pieces, but the bails are different and that changes the shape of the whole piece. My copper pendant is more flared out and the silver one is more narrow. I just think it is neat how following the same set of instructions can turn out differently. It just proves that each piece is a one of a kind creation because it is a made by a person and not a machine.
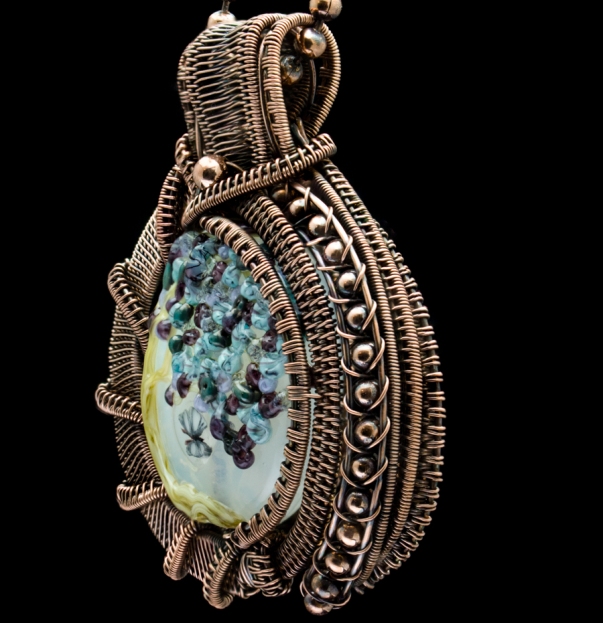
The fourth piece I have to share is a necklace I made following the Delicate Hearts Pendant tutorial by Nicole Hanna. I was looking forward to using this tutorial with some other heart shaped lampwork beads I bought last year, but I couldn’t use them because the hole ended up being horizontal instead of vertical. So the heart shaped lampwork bead I used was made by Jacqueline Parks and it had the needed vertical hole in it. I actually started on this piece the day I received the bead because it was so pretty and I just couldn’t wait. I thought the tutorial would be a quick one for me, but those turned out to be famous last words. It ended up taking me three evenings to work through it and get it to the point to where I was pleased with my wire work. I did stress out over how long it was taking me, but I told myself to relax and enjoy the process…not an easy thing when I had the expectation that I could make it pretty fast.
Here are pictures of the completed necklace…


This is the first piece that I have made that I am not really happy with as a finished product. I really like the bead and I think the wire work looks pretty, they just don’t go well together in my opinion. I think at some point I will redo this piece (unless someone really likes it as is and purchases it), but for now I am leaving it because there are many more projects in my mind to create in the near future.
The fifth and final project I have to share is by far my favorite. It is a piece that I created without following any tutorials and just waited to see where the wire would take me. When I cut my wire and began weaving I was actually working with an entirely different bead. I became frustrated that is wasn’t working out and then I realized that it would work perfectly with one of my lampwork beads made by Molly Cooley. I switched gears and over a three week period the piece was born.
I won’t make you wait to see it because I am too excited to share it, so here are some pictures of my finished necklace which I am calling “Flourishing in Spring”…

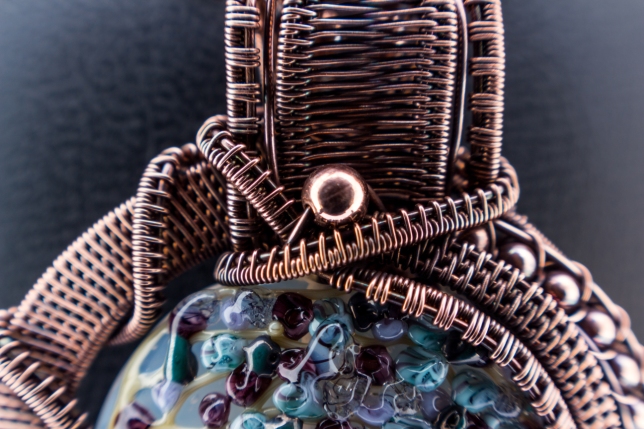


Didn’t it turn out lovely! I honestly didn’t know I had it in me to do that, especially without a tutorial to follow.
There are a few firsts that I experienced in creating this piece. The biggest first would probably be the bead I was working with. It is the most expensive thing I have wrapped and I was nervous about that fact because I wanted my wire work to do the exquisite bead justice, but at the same time not overwhelm it.
The most complicated first I experienced with this pendant was running out of base wires and needing to add more to it to create the results I wanted. I wasn’t sure how to do it at first, but then I realized the bead itself was the answer because the lampwork bead is very sturdy and had a pretty good size hole through the middle which proved to be very accommodating for adding in two extra base wires.
The final first I experienced in creating this piece would be the need to brace the lampwork bead so it didn’t spin. I was trying to figure out how to do it, and I finally ended up adding a thick weave along the back and anchoring it to the front. It was a bit challenging to weave in tight spaces during this process, but it was a good challenge.
Here is a picture of the back of the bead to show you what I mean…

I am very pleased with how this piece turned out and even more thrilled that I am starting to develop my own style in wire wrapping. One thing about this pendant that I found interesting is how the wire weaving ended up matching the bead. The left side is simple and the right side is full and bursting with weaves and texture. The lampwork bead has the tree trunk on the left and the right side is bursting with leaves. I can honestly say I didn’t plan it that way, but I was so excited that it matched the flow in that way.
I look forward to creating more pieces without tutorials in order to see where my creativity will flow and creating some more pieces with tutorials so I continue to learn.
Whew, this is a long post! I think I may need to share a little more often and not let it build up, but we shall see how time allows. For now though I must get back to tidying up, wire wrapping, and everyday life. I hope you have a blessed week and thanks for reading!

Hello :). Not sure how this works, but I just had to tell you how much I love these pieces!! Wish you were in the area and holding classes. I have several hearts very similar to yours. Made a bracelet and necklace using all beads. I have no training, just started last year on a whim. Also your cleaning out process sounds interesting in the spiritual sense. God bless
LikeLiked by 1 person
Thank you very much! There are many tutorials on the internet that can help you learn the basics of wire working if you are interested. I started out working with only beads as well, but then I saw my first wire woven necklace and fell in love with it. I never dreamed I would be creating things similar to it one day. As far as my tidying/decluttering event, it has been very interesting. I hope to share my complete experience once I have finished it.
LikeLike
You do amazing work. I am just getting started and hope to do things as beautiful as yours, someday, at least.
LikeLiked by 1 person
Thank you Michele! Good luck in your own jewelry making journey!
LikeLike
I love the exquisite work you did with the wire Yes the bead is beautiful but your work is amazing. I just spent a few hours doing copper wire work and although I love doing it I have fibromyalgia and am starting my pain now and must stop. I wish I could do the beautiful work you do and I applaud you for your work and for the wonderful large pictures you posted here for all of us to see, learn and enjoy…
LikeLiked by 1 person
Thank you very much Rita! I am sorry for your struggle with pain and fibromyalgia. I have some health issues that affect my adrenal glands which causes a lot of issues with my energy levels. This helps me to relate with you on needing to stop and not being able to do what I would like to. I hope that you are able to take things slow and continue your own journey with wire at your own pace. Thank you again for your kind words.
LikeLike
All I can say is ‘wow!’. I’m quite new to wire work and if I ever get this good I will be thrilled. I am going to take a look at some of those tutorials’ is I think I need all the practice I can get. Brilliant !
LikeLike
Thank you Jenny! I have enjoyed learning new things through tutorials over the years. Now I am really starting to enjoy branching out into more of my own designs.
If you are looking for tutorials, there are many available on YouTube and in Facebook groups. Personally, I really have enjoyed Nicole Hanna’s.
Good luck in your own wire jewelry journey!
LikeLike