Category Archives: Jewelry Making Challenge

Week Twenty-Six…The Grand Finale

I cannot believe I am just wrapping up the final week of my six month challenge!  There were a couple of weeks that made this challenge feel like it might last forever, but overall it has gone so quickly!

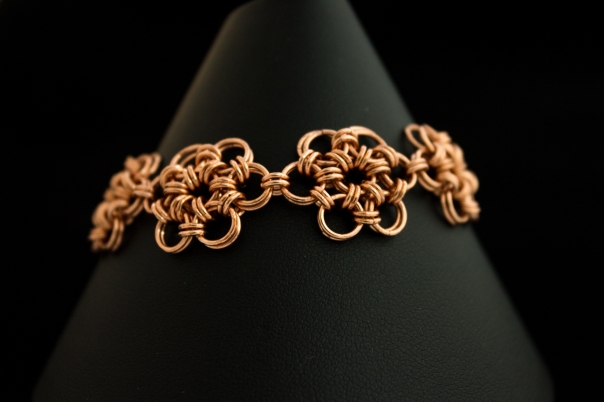
When I chose the project for my “finale” I wanted it to be the most complicated piece I have done yet and it really was.  I completed the Freeform Wire Bracelet, which is the final project from Sarah Thompson’s class “Wire Weaving Bracelets-Basics and Beyond” (found at craftsy.com).  This bracelet took all of the skills I learned from the beginning of the video series and combined them into one.  I knew this project would take me a while to complete and I was a little concerned about the time especially with all of the Christmas stuff going on this week, so I did a lot of my basic weaving last week.  I think doing that helped me to finish this week.

Here is a picture of what I finished last week and gave as a teaser picture of this weeks project…

img_2597
Beginning of Freeform Wire Bracelet

When I continued the bracelet this week I was surprised that there was a little mental hesitation to move forward in each new step.  Despite the hesitation, I was able to move forward without too much problem because finishing the project this week was the only option in my mind this week.  I didn’t expect to be completely cured of the doubt in my ability to accomplish things, but this struggle seemed out of place at the finish line.  I am thankful that the Lord helped me to press forward whenever I wondered if I could complete it.

Something I found challenging as I was weaving this project is the length of the 3 base wire component that is shown at the top of the previous picture.  I wanted to make sure I had enough wire, so I cut it a little longer than the tutorial said.  That is something that I always do when I am following any tutorial because I can always trim the extra, but it is a pain to add more.  In this case, I added way too much and it made it difficult to wrap around the really long wires and it tired my arm out quicker, so a tip is to cut the wire a little longer, but not too long…unless you are aiming for a good arm workout. 🙂

Here are some pictures of the completed bracelet…

2015-12-27-19-04-27-bradius8smoothing4
Freeform Wire Bracelet (front view)
2015-12-27-18-54-15-bradius8smoothing4
Freeform Wire Bracelet (side view)
2015-12-27-18-51-34-bradius8smoothing4
Freeform Wire Bracelet (side view)
2015-12-27-19-11-59-bradius8smoothing4
Freeform Wire Bracelet (clasp view)

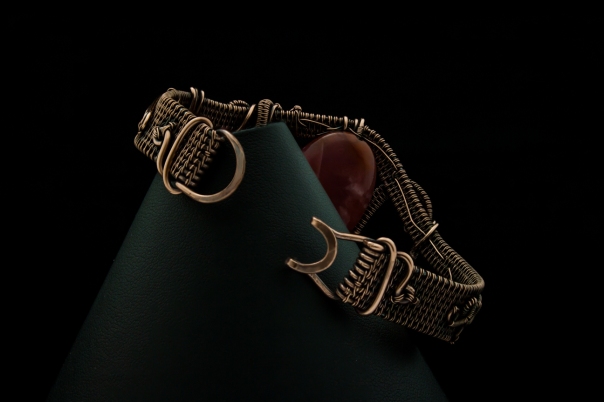
Overall I really enjoyed making this bracelet because of all I learned in the process and the challenges I conquered to get to the the finish line.

One thing that was exciting to me was while watching the video to see how things were done in general my mind was opened to new concepts of the construction of jewelry making that I will be able to apply to my own designs in the future.  That is where I hope to go with all of my knowledge that I have gained over the past six months is to find my own style and see what I can create there.  I won’t lie and say that is a fun and exciting prospect…honestly it can leave me quaking in my boots if I think about it too much, but it is the place where I want to go in the future and I think this project gave me the first taste of it by being a “freeform” design.  The finished product that I created isn’t the same as the one Sarah Thompson did in the video tutorial.  I actually had to take my wire components and then form them.  At first I was not enjoying it and my mind was crying out for someone to tell me what to do with all these components, but I just started  and the more I got into it I started having fun and I started seeing the beauty in it.  It was a challenge to make my components work together and come into the harmonious completed piece, but I did it.  There were a couple of things I did that made it harder on myself such as ending wires too soon, but I was able to problem-solve and figure things out pretty quickly and without any drama. That is a sign of growth because in the early parts of this challenge most any snag in a project shut me down for a while and made me wonder if I had bitten off more than I could chew.  I am so thankful for the Lord’s help and growth!

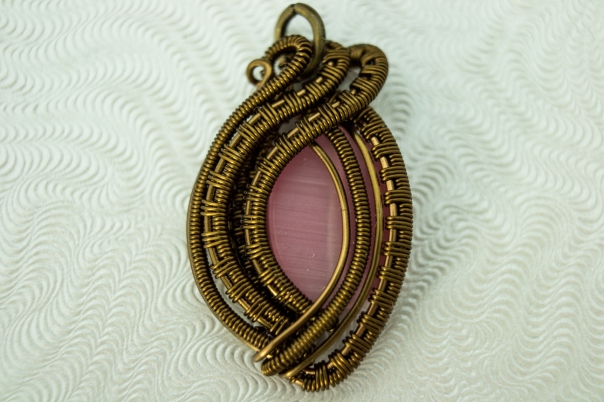
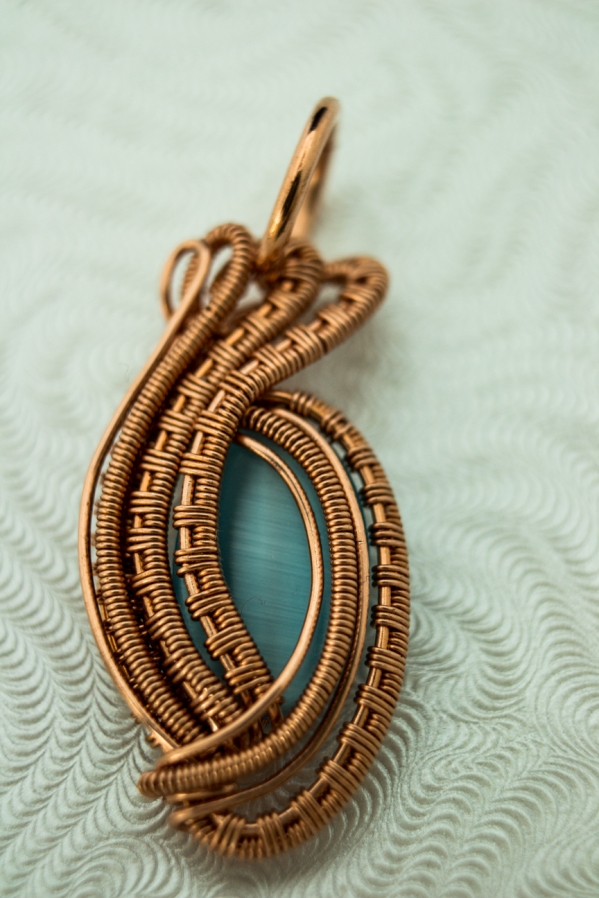
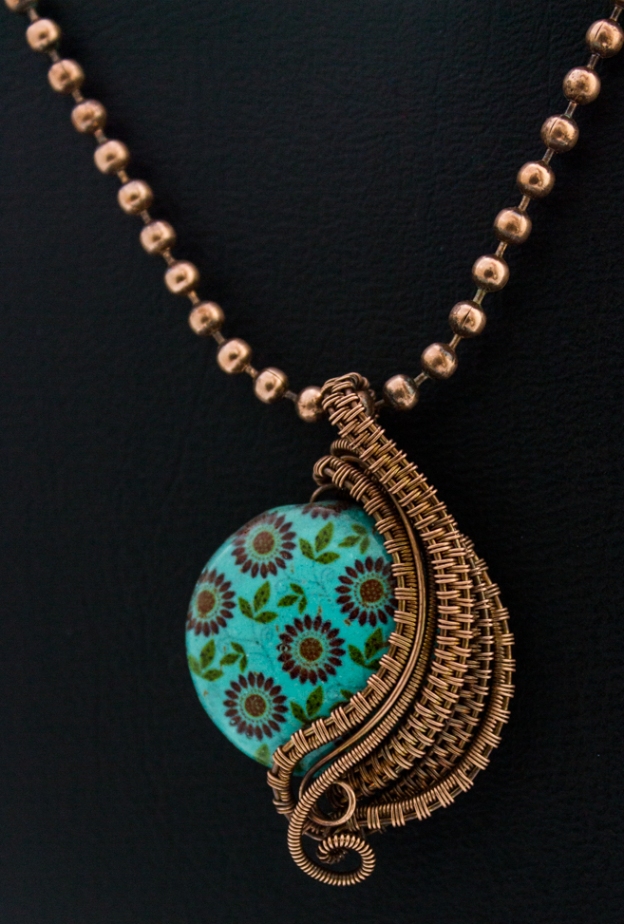
I also oxidized pendants from the last two weeks so that all of my Jewelry Making Challenge projects are completely finished.  Here are those pictures…

img_2672
Oxidized Earth Mother Pendant
2015-12-27-20-46-13-bradius8smoothing4
Oxidized Be Mine Pendant

Well it is time to wrap things up for my Jewelry Making Challenge.  When I started this challenge I wanted to strengthen my perseverance, use some the tutorials I have been hoarding because they are “too hard”, and to make jewelry making a regular part of my life.  I have accomplished all of those things in this challenge and so much more.  As I look back I realize this experience has been like going to jewelry making college.  I have learned so much and accomplished so much over the last six months.

Here are some of the things I have learned or been reminded of (not in any particular order)…

~Setting goals and having a vision will help you get to where you want to go.

~I can make beautiful things with wire and beads…even when it feels like I can’t.

~I can embrace a challenge and push through it instead of it stopping me in my tracks.

~Keep things focused and simplified to succeed.

~The Lord has given me many gifts and He will help me use them.

~I need to be patient with the wire…and myself.

~I don’t need to have guaranteed success for me to step out and try something because I can take risks.

~A temporary setback is not a permanent failure.  It is only a permanent failure if I never try to begin with.

~Safety isn’t always comfortable.

~Taking the first step is the hardest part of accomplishing something.

~I found the confidence to open an Etsy store and start selling my jewelry.

I am sure there are many more things that this challenge has taught me and I will continue to reap the benefits and blessings of persevering through the good and the bad.  The question is where do I plan to go from here.

I plan to take some time off from wire working and blogging on a specific schedule like this challenge has required for starters.  I want to play around with wire and beads without tutorials and see what I can do.  I will still do tutorials because there were many amazing projects I couldn’t fit into this challenge and I want to continue expanding my knowledge of jewelry making, but for a while I want to see if I can’t find my own style of wire wrapping.  It is a scary prospect, but I will stick with it and see what happens. 🙂

I also plan to still blog about what I am learning as I go, so there will be new posts about my exploits in wire wrapping and jewelry.  I will also probably blog about some things other than jewelry that I am up to since this blog is about the journey of living life and jewelry making is a small part of my life.


Week Twenty-Five…Least But Not Last

The tutorial I chose this week was the Earth Mother Pendant by Nicole Hanna.  It was a very straight forward tutorial that I had fun working on and didn’t really take me that long to do.

The tutorial calls for an oval bead, but I have already used the oval beads I have in that size in other projects, so I chose to use a tube bead of the same size and it turned out fine.

Here are some pictures of the completed pendant…

img_2582
Completed Earth Mother Pendant
img_2587
Side View of Earth Mother Pendant
img_2591
Side View of Earth Mother Pendant
img_2595
Top View of Earth Mother Pendant

I will oxidize it next week along with my other projects and finish up the challenge with completed and oxidized pieces, so stay tuned next week for those pictures.

Do you want to know something funny?  Well I didn’t actually set out to complete the tutorial listed above at the beginning of the week.  I had actually been working on something else.  I wanted to complete something really complicated for my “final” project which would have been next week’s project.  However, I was uncertain I would have the time needed to complete it because Christmas is next week, so I thought I would tackle it this week.  Well I began on it and the stress was building because I didn’t think I was going to finish it this week either due to feeling a little under the weather and normal busyness of this time of year…and to be honest I reached the point that I would be trying something new and I was feeling apprehensive about doing it.  (Yes, I know we have conquered that already, but it will probably be something to conquer again from time to time.)  So I opted to pull out a tutorial to complete this week that I have been eyeing for a couple of weeks and that is the project above (Mother Earth Pendant).

Now I head into this week…my final week of the challenge…with a good start on my project, but ready to complete the new techniques that I was apprehensive about last week!

Here is a picture of the components of next week’s project…

img_2597
Components for next week’s project

Can you guess what I am making?

Sorry, I am not going to tell you yet.

Stay tuned for the final project of the Jewelry Making Challenge and I hope it will turn out great…to be worthy of the finale. 🙂  Have a blessed week!


Week Twenty-Four…Soldering Jump Rings

Several weeks back I realized that I needed closed jump rings for some of the tutorial projects I wanted to complete.  At the time I didn’t know what a closed jump ring was.  I mean I had done a lot of chainmaille and that required a lot of opening and closing of jump rings, but I figured that isn’t what the tutorial was asking for. 🙂  After I did some research, I figured out that a “closed jump ring” is a jump ring that has been soldered closed which creates a stable ring to use in anchoring wires and different wraps without it coming apart. (At least it shouldn’t come apart of if it was soldered correctly, but that is a different issue. 🙂 )

Here is a picture showing what I mean…

img_2562
Back of closed jump ring on the finished piece

When I discovered in Week Nine (https://thejourneyoflivinglife.wordpress.com/2015/08/30/week-nine-findings-and-metalsmithing-basics/) that I needed closed jump rings and didn’t have them I went ahead and made a clasp with regular jump rings to see if the the closed jump rings really would be necessary.  I can tell you with a clasp especially they really are necessary.  You might be able to sneak by with other projects depending upon what the jump ring is used for but a clasp will usually have a lot of weight tugging at it in general and it will make the jump ring want to open over time and in the case of my clasp that means the weaving could slide right off.

Here is a picture of the clasp I am talking about…

img_0005_1
Bell Woven Toggle Clasp from Week Nine

All of that to say that I think when a tutorial calls for a closed jump ring it would be good to listen. 🙂

I looked into purchasing some closed jump rings and quickly realized they were more expensive than I wanted to pay.  They weren’t too expensive in general, but since I have the equipment to make my own jump rings and usually like to do things myself if I can I didn’t want to pay the amount asked for.  Jump rings are time consuming and require a lot of effort to make in general (see my Week Sixteen post), so the cost is well justified for nice handmade rings if you aren’t wanting to do things yourself.

I already had the jump rings, but I didn’t have anything to solder them with.  I had tried to solder some jump rings about three years ago with my husband’s soldering iron, but that did not go well at all and I was convinced I would never learn to solder.  When I did my research on making closed jump rings I found a great video from beaducation.com on using soldering paste to make closed jump rings.  I had no idea what it was, but I knew that the video showed a process that I was pretty sure I would do.  I have gathered the items I needed to complete the process and this week I finally sat down to try it.

When I first sat down to solder there was that momentary thought of “Can I do this or will this turn out like my first soldering attempts?”.  I quickly got over that and just dove into trying it.  (Yes this is extreme growth since the beginning of my challenge where my doubt would keep me locked up for a few days before I would start trying something, yaaa for progress!)

Here is my soldering set up…

img_2547
Soldering Tools

Once I got started and applied the solder paste to the jump ring things went pretty well.  The only issue I really had was trying to figure out where my flame was going and making sure it was heating the ring and not my fire brick.  It was pretty much a trial and error thing, but they all turned out.

Here is a picture of the soldered jump rings…

img_2552
Closed jump rings before cleaning

Normally when people solder they use a pickling solution to clean off the fire scale, but I used a product called Penny Brite.  It was really simple to use and it turned out really well.

Here is a picture of my cleaned jump rings…

img_2554
Closed jump rings after cleaning with Penny Brite

Once my jump rings were cleaned I realize two things.  The first was that I had misplaced my solder on one of the jump rings and it didn’t seal. (The top left ring in the picture above didn’t close.) So I need to remember to make sure that I place the solder over the place I want to close and I use enough solder to close it.  The second thing is I realized that the silver color of my solder was there to stay.  I had purchased silver solder paste because that is what the video was using and I didn’t know there were different types of solder paste.  There actually is copper solder paste that will match the color of the copper wire I use more closely than the silver, but I found out through a wire jewelry group I am apart of that the color isn’t exactly the same.  Someone in that group mentioned that if you add something stainless steel to your pickling solution you can copper plate the solder to match the color better, so if you use pickle you might try that.  I haven’t used the pickle solution before, but I thought I would share that tip for those who have.

Soldering the jump rings was my main project for this week because I was unsure of how it would go, but since it went well I had time to make something with my closed jump rings.

The project I chose to make is the Be Mine Heart Pendant using the tutorial by Nicole Hanna.  I think hearts are my favorite shape in wire working and I was excited to make one.

This tutorial uses a weave called 6/1.  The weave is beautiful, but very time consuming for me.  I found my base wires kept getting tangled even thought I was bending the ends out to know which was which.  I did get a little faster as I went, but it still took me a couple of hours to do the rounds required for the pedant.

Here is a picture of the 6/1 weave I am talking about…

img_2563
6/1 Weave

Apart from the weave being a little slow this piece came together really nicely.

Here are some pictures of the completed pendant…

img_2568
Completed Be Mine Heart Pendant
img_2558
Completed Be Mine Heart Pendant
img_2565
Right Side View of Be Mine Heart Pendant
img_2570
Left Side View of Be Mine Heart Pendant

When I finished the pendant, I wasn’t quite sure I liked it and I wasn’t sure why.  After thinking about it, I realized that I like the back part of my jewelry to be more hidden and there aren’t many places to hide things on this piece.  I realized that is something else that is probably a part of my own personal style.  It is always exciting to see my own tastes and preferences emerge, especially since I have spent the last six months submerged in other people’s designs.  I am looking forward to the day when I sit down with the wire and see what comes out…and hopefully it will be much more than wadded wire. 🙂  That day will be coming sooner than I think and I will have the confidence I need to conquer any fear of trying something new and unknown…especially since there isn’t a guarantee that I will succeed.  Learning to fail well is something that I have embraced more during this challenge as well and I am so thankful that the Lord has helped me to grow in that area as well.

Two more weeks to go before this challenge wraps up!  I am trying to figure out which tutorials I will finish up with.  We shall see…

I hope you have a blessed week that is full of love, laughter, and creativity!


Week Twenty-Three…Worry and Getting Faster

This week I started off with two large projects.  One was a special order and the other my project of the week.  Now in my mind both of these projects were complex and would take a lot of time to complete.  I was tempted to choose something easier to work on for my project for this challenge, but my challenge is winding down and I want to finish well, so I stuck with it, but it wasn’t easy.

Early in the week, it seemed if I wasn’t working on my jewelry projects I was worrying about my projects not getting accomplished.  It was quite maddening to say the least.  Have you ever had a nagging sense of worry about something?  I do and this week it was these projects.  It is a bit embarrassing to admit, but for about half a day I avoided them because I was worried I couldn’t do the projects and I would mess them up.  Sigh, I am so thankful the Lord helped to pull me out of that worry and doubting mess because the fact is I could do the projects…I was just focusing on the wrong things.  Our minds are wonderful and complex things and when we let worry or other negative thoughts start to take over we can get trapped pretty quickly and it is very hard to get out.

I got to the middle of the week and things finally clicked fully into place.  I determined a time that I would work on one of my projects and I made myself sit there and work on it even though I found myself wanting to stop and work on something else several times.  (Yes, I tend to have attention issues and am easily distracted, but I manage…most of the time. 🙂 )

So, I made myself sit there continuing to work and would you believe I was finished much quicker than I thought possible.  I was in a small state of shock that I finished.  Sometimes in my mind the more complex projects are like a theater production to be accomplished in different “acts” broken down over the week.  This week I didn’t have the luxury of breaking things down if I was going to accomplish what I hoped to.

After I recovered from the shock of finishing the first project I moved onto my project for this weeks challenge.  I chose to do the Woven Stacking Bracelet which is a tutorial found in Fine Art Wire Weaving by Sarah Thompson.  I think it is a great book for anyone who wants to take their wire weaving to the next level.  If you are completely new to wire weaving I don’t recommend it as a beginner book unless you are ready for a challenge.

Anyway, when I started my Woven Stacking Bracelet I started with a large strip doing the Modified Soumak Weave with four base wires.  I have done this weave in other bracelets in Week Eight and Week Fourteen, so I knew it was going to take some time to accomplish the amount of weaving I needed to do.  Well, I was in for quite a surprise once I started.  I was weaving neatly…and wait for it…QUICKLY.  I was so amazed.  I guess I finally found the groove required for that weave to go fast like I have seen others do in different videos.

My speed of wire wrapping is something that I have struggled with during my wire journey because I want to make things to sell, but it can be hard to charge a fair price and pay for my time on more complex projects.  It can also be discouraging when I fall into the comparison trap and see people posting pictures on Facebook of the three wire projects that they made that day…when it would have taken me all week.  I guess I need to remember all the other factors…those projects might be all they did that day and jewelry is their primary focus.  My primary focus or “job” is the running of my household and jewelry is something I am incorporating into that, so my time will naturally be spent differently.  The Lord has been helping me not get caught up into the comparison trap like I used to by focusing on my own journey in life and for this challenge my own journey in wire.  It is not an easy thing to do, but I have found it to be possible with His help and I am so much happier and more productive when I am living my life instead of watching someone else live theirs.

My bracelet for this week came together pretty nicely and quickly.  The only snag I ran into was when I was assembling the bracelet, but I worked through it.

Here are some pictures of the Woven Stacked Bracelet…

img_2519
Woven Stacked Bracelet
img_2522
Woven Stacked Bracelet
img_2523
Woven Stacked Bracelet
img_2521
Clasp of Woven Stacked Bracelet


I oxidized my projects from the past couple of weeks, so here are pictures of the Candle Flame Pendant from last week…

img_2530
Oxidized Candle Flame Pendant From Week Twenty-Two
img_2528
Oxidized Candle Flame Pendant From Week Twenty-Two


I am looking forward to my jewelry project for Week Twenty-Four…I think I am going to play around with my soldering stuff for the first time.  We will see how that turns out.  I hope you have a blessed week!


Week Twenty-Two…A Remake and Realizing I Don’t Want to Learn Something

The tutorial I chose for this week was a free tutorial that IMNIUM recently released.  It was for a woven band technique that could be used in many different ways, not a completed project.  I had never attempted anything like this, so it was a new experience to be sure.

I cut my wire and took my time in trying to figure out the directions…it is a free tutorial, so there is a little guess work involved.  When I began I left enough extra wire so I could end the woven band without running into problems.  I started this project holding it in my hand, but quickly realized that I needed a clamp because I had to hold it pretty tight and my hand was aching already.  I switched to a spring clamp I had and things seemed to be going along pretty well until I got a little ways above where the clamp was holding it.  I re-positioned the weave and tried to get it  straight, but wasn’t successful.  I was quickly coming to the conclusion that this project wasn’t something I really wanted to learn.  I had the basic technique down, but I found the process a little boring and I knew it was going to take a lot of patience and time for me to figure out how to get a consistent weave.  I found it encouraging to realize that by being able to eliminate this type of weaving I had identified part of my jewelry “style”.   Figuring out my style is really another long term goal for me and one I should have realized this challenge would help me in.  I desire to take wire and beads or cabochons and just create and see what comes of it, but I haven’t had the confidence in my abilities and thought I would end up with a wad of wire and my perfectionist side could not stand that. 🙂  Did I mention I am so thankful for how small that perfectionist side has become thanks to all of the growth through this challenge!

Anyway, since I decided I really didn’t want to put the time in to perfect this new weaving technique and I also didn’t want to continue to waste wire, I stopped the project after a few rows.

Here is a picture of how far I did get…

img_2507
Weaving Technique from IMNIUM Tutorial
img_2510
Weaving Technique From IMNIUM Tutorial

It is an interesting project and I may pick it up again some day, but right now I have so many other things I really want to make and I am realizing how valuable my time is and how I need to focus and prioritize things so they get done instead of thinking I can do everything.

So, I found myself midweek with a project I really didn’t want to do and family and Thanksgiving right around the corner, so I momentarily freaked out trying to figure out how I could end up with a completed project in spite of the time crunch.

When I started this challenge I switched to using only raw copper wire on the projects because I grew tired of using plated and coated wires that would end up with scratches and tool marks no matter how careful I was.  I have been so pleased with this choice because I can file and buff out any marks that end up on the wire and I really like the finished look of the oxidized copper.  As a result there are several pieces I have wanted to remake with my new wire, and that is what I ended up doing for my “finished piece” for the week.

The piece that I did a remake of was the Candle Flame Pendant which I made following the tutorial by Nicole Hanna.  (I am sure by now you can tell I prefer Nicole Hanna tutorials to any other. 🙂 )  When I made the first one I didn’t actually like the pendant as I was making it, but after I finished it I really did like it.  This taught me to wait until I complete a piece to decide if I like it or not.

When I start making a piece, there can be some doubt in my mind wondering if I can actually make a piece.  This was one of the reasons I wanted to do this challenge…to battle that and grow past it.  This week I am seeing the fruit of that growth.  When I started making the new Candle Flame Pendant, that question popped into my head…will I be able to make this.  The answer was almost immediate…of course I can…I already have made it!  It was a great thing to just simply make a piece and not waste time on whether I could or not.  I hope that confidence is something that continues to grow in me!  Things went really well and fast on making the new pendant and I did it while enjoying time with family.

Here is a picture of the first Candle Flame Pendant I made using Vintaj Parawire…

img_2512
Candle Flame Pendant made with Vintaj Parawire


Here are pictures of the one I made this week using raw copper wire…

img_2518
Candle Flame Pendant made with Raw Copper Wire
img_2514
Candle Flame Pendant made with Raw Copper Wire

I didn’t have time to oxidize the pendant this week, so I will do that at a later time and post more pictures when it is finished.

One thing I found interesting in remaking this piece is how differently they turned out even though I followed the same tutorial.  I guess that is why each wire wrapped piece really is one of a kind because when you make things by hand there will always be variations of some kind.  There is something really special about handcrafted things and I am thankful that I can create some of those things.

Here is a picture of both pendants so you can see the differences…

img_2516
Candle Flame Pendants (Vintaj Parawire on left) (Raw Copper Wire on right)

This week December will begin and it will be a very full week for me, and I am sure that your schedules are very full too!  I hope you have a great week and things don’t get too crazy for you…or for me!  May the Lord help us all as we go through life this coming week!


Week Twenty-One…From Plan A to Plan B

When the time came for me to pick the tutorial to try this week, I knew immediately which one I wanted to do.  I was really excited to try the Gnome Cab Wrap Pendant by Nicole Hanna.  I knew it would be a challenge, but I was up for it…until I realized that all of my beads were still buried from my “organizing” project that is dragging out and I didn’t have a clue where the cabochon I wanted to use was.  Well that was my “Plan A” for the week.  I was pretty deflated at this point.  I started to feel like a petulant child who wasn’t getting their way and wanted to sulk, but I quickly realized I had way too much to do, so I moved on to “Plan B”.

The tutorial I tried out this week was the Twined Pendant by Nicole Hanna.  It was a fun piece to work on.  After working on a chainmaille piece last week, I found I really enjoyed weaving the wire as opposed to working with rings.  It was nice to enjoy working on a piece and have fun with it instead of feeling stressed about how it was turning out.  There were a couple of things that I altered after I had made the pendant because I didn’t like the way they looked, but after the adjustments I am very pleased with it.

Here are some pictures of the finished pendant…

img_2292
Twined Pendant
img_2288
Twined Pendant
img_2296
Side View of Twined Pendant

Something else that I worked on this week was the flower chainmaille bracelet that I did last week.  My real project from last week was painting my bookcases for my craft room, but I put together the bracelet to have a jewelry project completed.  Because I was more focused on the bookcases I didn’t want to spend time on a clasp, so I used one I created in Week Nine.

img_2265
Flower Chainmaille Bracelet with Bell Woven Toggle Clasp

I was hesitant to use the clasp on an item I would sell because this particular clasp should have been made with closed jump rings and I didn’t have any at the time.  I was unsure of how the clasp would hold up under the stress of chainmaille, but since the bracelet was going to be mine, I could easily fix it if it broke, or I could eventually replace it with something more suitable to a chainmaille bracelet.  What I didn’t anticipate was someone seeing the bracelet and wanting to buy it.  I explained things to this person, and they said they wanted the bracelet and I could make a different clasp for it.  I ended up using a different clasp that I had also made in Week Nine.  It was the Hammered S Clasp Hook and then I used a new chain link I found recently to make a closure for it.  I am so pleased with how it turned out and feel confident it will hold up under the stress of chainmaille!

Here are some pictures of the flower chainmaille bracelet with the new clasp and after it has been oxidized…

img_2276
Oxidized Flower Chainmaille Bracelet
img_2273
Oxidized Flower Chainmaille Bracelet with New Clasp


img_2271
Oxidized Flower Chainmaille Bracelet

Week Twenty…A Quick Project and A Long Term Investment

Lately I have been feeling really stressed trying to get in my jewelry project and it has started to feel more like work than the fun it usually is.  My husband reminded me I needed to find fun in it again and not just choose projects because it would teach me something, so this week I did something a little different.

I was originally going to do some soldering, but then I realized that I would really like to have my jewelry making supplies organized so I can find things without having piles of stuff to go through.  I started by removing everything off of my bookcases and then I looked at them and realized that it would be really fun to have pretty shelves that inspired creativity…instead of making me think yuck and I hate having mismatched shelves, but I am thankful for the storage room they provide.  So there I found myself three projects later looking at pinterest trying to find that pin I had saved for the “perfect” moment when I finally found the gumption to paint my laminate book cases.  I though it sounded silly to try, but I got brave and believed pinterest…first mistake, but we will get to that…

I figure out what I would need and then I purchased some supplies.  The first bookcase went fine, but I realized this project was going to take a lot more time than I had anticipated.  It was when I started on the second bookcase that I realized that pinterest lied.  The primer was supposed to stick, but it didn’t…I could see it balling up like water does after applying RainX.  I tried some sanding, but that still didn’t work well.  Then I went to the store and bought the more expensive primer that boasts “sticks to glossy and laminate surfaces without sanding” and hoped for the best.  I applied some of it and it did a little better, but it was still balling up in some places.  I returned the expensive primer because it lied.  I found myself wishing I never started the project, but I had so I could only move forward.  My husband used his belt sander and heavily sanded the bookcase and then I added some of my original primer and praise the Lord it worked!  He spent a lot of time fully sanding that bookcase for me and I felt a little guilty (for taking up so much of his time) and a whole lot loved.  There was one more bookcase that was going to need sanding, but I decided it wasn’t worth saving and donated it instead.  Now I begin this week with one of my bookcases completely painted and the other one sanded and ready to prime and paint.

Here is a picture of the bookcases before I started any of the process…

img_2214
Before picture of the three bookcases

Here is the one I have finished painted…

img_2268
After picture of the white bookcase
img_2269
After picture of the white bookcase

I know I will be very happy with them when they are finished, but I certainly bit off more that I anticipated.  Sometimes I think that is how the Lord gets us to do things that we never would normally…by not showing us the whole picture…but in the end it is always worth it!

Now while I was working on my jewelry supply storage space I did finish a chainmaille bracelet that I started a few weeks ago.  The chainmaille pattern I used is the Japanese 12-2 weave and I made flowers with it.  There isn’t a specific tutorial I used, but there are many online that can be used.

I decided to use the Bell Woven Toggle Clasp that I made in Week Nine from a Nicole Hanna tutorial to finish off the bracelet.  I had already oxidized the clasp, so it is different color from the chainmaille in these pictures, but I plan to oxidize the chainmaille part also.

Here are some pictures of the finished piece…

img_2265
Completed Japanese 12-2 Chainmaille Bracelet with Bell Woven Toggle Clasp
img_2267
Complete Japanese 12-2 Chainmaille Bracelet with Bell Woven Toggle Clasp
img_2259_1
Completed Japanese 12-2 Chainmaille Bracelet with Bell Woven Toggle Clasp
img_2256_1
Completed Japanese 12-2 Chainmaille Bracelet with Bell Woven Toggle Clasp

I am please with how the bracelet turned out and it was fun to change up the pace of things a little bit.  I am excited about the upcoming week’s project and looking forward to finishing my bookcase and organizing project.  I hope you have a great week!

Week Nineteen…Transformation and Perseverance

When I look at a spool of wire I see an endless possibility of things that could be made with a few swirls, loops, coils, and weaves.  What do you see?  Most people would see different things and it would likely depend upon your life experiences.  When I make my jewelry there is a transformation that happens.

It starts out looking like this…

img_2193
22 gauge and 28 gauge round copper wire

And then with the help of a tutorial or two and a few beads, it looks like this…

img_0009
Wrapped Up Heart Pendant from Week Six

That is pretty cool.  Before I started making wire jewelry, I would look at copper wire and think it was something to be used for plumbing and electrical things or recycled.  It certainly wasn’t something I ever thought I would be using in my crafts, let alone become my favorite thing to create with.

While that is interesting you may be wondering what it has to do with my jewelry challenge and my project of this week…I should say two weeks.  Well, while creating the Love’s Embrace Ring (tutorial by Perri Jackson, Shaktipaj Designs) which I did start two weeks ago, there has been a transformation going on inside of myself.

In the Bible it talks about sufferings producing perseverance, perseverance producing character, and character producing hope.  I have seen this transformation happening inside myself when I look back at the process of creating this ring.  I started out with excitement, but it quickly became suffering because it was a completely new technique and a new way of putting a ring together.  I don’t know about you, but I like things to be comfortable and predictable…this tutorial was outside of that comfort zone and it made me really not want to do it.  (Now I don’t think this suffering was hard in the big scope of life, as my mother in law says “Some people have real problems”, but at the time this felt like suffering.)

Now I would love to say that I just pulled it all together, put on my big girl panties and whipped out the ring in a hurry, but we all know that two weeks isn’t whipping something out in a hurry. 🙂  I saw some definite character flaws revealed as I tried to work on this ring.  I was amazed that even thought I am thirty-four my behavior resembled that of a seven year old that has to clean her room or a three year old who has to eat two more bites of her dinner…the fit throwing and the putting off of the inevitable.  Now I should clarify that I didn’t throw any fits on the outside…that might make my husband feel the need to take me to a doctor for help.  It was more of a bad attitude on the inside all the while procrastinating and not working on the project until the last minute.  Sigh, I guess we all have days like that…I would just like to be the grown-up I imagine myself to be.

Well onto the transformation part… 🙂

Here is the part of the ring that I accomplished the first week…

img_2169
Beginnings of the Love’s Embrace Ring

Not a bad beginning, but it took me a week to work through the tutorial and finish this much. (Yes, there is a lot more to it than I mentioned, but that is the short version.)  Now, how do I know I could do it faster?  Well, this week when I went to do the second part which looks just like the picture above it took me about 30 minutes.  Boy did I feel silly…like a three year old who has been sitting there for three hours miserable because she had to eat two more bits of her dinner before she could get down and she is stubborn enough not to take them…I could have saved myself a lot of emotional drama, but sometimes I need to learn the hard way.

The lesson I learned is that sometimes it is better to just do something than worry about whether you can do it because it will save a lot of time and emotional drama.  And even if I mess up, I can usually recover pretty well or I can start over using the new lesson I learned by messing up.

In my post last week I mentioned that I ordered half round copper wire to finish out the band of my ring. The tutorial called for half round copper wire, but I didn’t have any and thought I could just weave the band and it would be stable enough.  I had never worked with half round copper wire and found it to be a funny wire at first.  For those of you who don’t know, half round wire is round on one side and flat on the other.  It definitely turned out to be the right choice to add stability to my ring band and I can see a lot of potential uses for it in future projects.

Here is a picture of the two 24 gauge wires and one 26 gauge wire that made up the band before I added the half round wire…

img_2174
Ring band before the half round wire was added

Here are some pictures of the finished ring…

img_2183
Completed Love’s Embrace Ring
img_2181
Completed Love’s Embrace Ring
img_2190
Completed Love’s Embrace Ring

I am so glad that I persevered through this project and am thankful that I have completed nineteen weeks in this challenge.  One of the reasons I wanted to do this challenge is to work on my ability to persevere on hard tasks and it is happening with the Lord’s help.

How do you respond to the hard things (whether big or small) that you have to deal with or do?  I have found the way I respond to the little “hard” things is often how I will respond to the big things that are actually really hard.  Here’s hoping for another week of strengthening those perseverance muscles and building character and hope so we can respond well!

Week Eighteen…Unfinished Steps, a Store, and Grace

What a week this has been!  I have been working on opening up an Etsy store to sell my jewelry.  It has turned out to need quite a bit of thought and quite a large amount of work even though I have been working on it for several weeks in different stages.  The last couple of days my mind has felt like jelly…you know when you crammed for a test in college and high school, but now I am rested and can hopefully complete a coherent blog entry.

The tutorial I chose to do for this week is the Love’s Embrace Ring by Perri Jackson (Shaktipaj Designs).  I have her Mother’s Ring tutorial which is a more simple version of the Love’s Embrace Ring and would have been something I could have finished this week most likely, but I went for the harder version…after all this is a challenge. 🙂

Well, the truth is I bit off more than I could chew and when I got into making the ring I realized that I didn’t have most of the supplies I needed to make it.  The reason this is odd is because before I started this challenge I went through and picked out the tutorials I wanted to focus on and made sure I had all the materials I needed and purchased most of what I didn’t have.  The exception to this was 20 gauge half round wire, which is required for this tutorial.  I figured at the time (back in June) I would be able to weave a band or something to make it okay…note to self don’t assume anything without reading the directions in detail.

The bottom line of all of this is early in the week I figured out how to make the beads I have work, but it was quite a challenge.  There was math involved…which usually isn’t fun, but is often necessary in wire work.  The great news is I figured out the bead issue part and was able to work my way through the first part of the ring.  The bad part is the more I read ahead, I realized I really did need the 20 gauge half-round wire.  There is no way I was going to trust a ring band to hold up with 2 little pieces of 24 gauge wire with one piece of 26 gauge wire thrown in, so I ordered the wire and it should be here this week.  So as a result of this, my ring isn’t finished, but should be by next week.  I know I made the right choice by waiting and doing it right.  Part of my pride is stung by not having a “finished” piece this week, but I will get over it.

I did learn a new technique this week and it was great once I got it down.  I found the beginning to be a little bumpy because I am used to Nicole Hanna’s tutorial lingo and progressions, so there will obviously be differences as I do tutorials from different people.  I am thankful that I stuck it out this week through all of the changes I had to do in order to work with what I had.  I will definitely order the proper type of beads if I make this ring again, but this has been an excellent way to make me think outside of the box and work outside of my comfort zone and make me think.

Here is a picture of the first part of the ring I have completed…

img_2169


Isn’t it a neat beginning of a ring!  I look forward to sharing the final piece with you next week.

Some things I learned this week…

~Thinking outside the box is hard, but it is possible and can make me stronger and more versatile.

~Trying and failing isn’t failure…trying and giving up is.

~I need to give myself grace, especially when I don’t accomplish what I thought I should have.

~Grace is a wonderful thing…it lets us get up and continue on when we have fallen.

~Things don’t have to be perfect for the job to be completed.

~I would rather take the time to do a good job rather than just finish the job.

By the way, here is link to my new Etsy store…

https://www.etsy.com/shop/WireWovenDelights

I will be adding more as I can get them listed.  It is so exciting that it is actually open…I tried a few years ago to sell some things and it didn’t work out.  I am a crafter and creator, not a sales person and it can be quite scary to put your stuff out there for sale…rejection comes hard to anyone and it can be my Achilles heal at times.  I think this time will be better because my skills have improved so much in that time and I am more confident in the pieces that I am offering.

Week Seventeen…Decisions and the Time They Take

My project for this week is the Egg Pendant Tutorial by Nicole Hanna.  I purchased this tutorial a couple of years ago.  It is one that I wasn’t ready to make at the time, but I looked forward to the day when I would be brave enough to try it.  Well, this week I was brave enough. 🙂  The funny thing about it was the tutorial ended up not being that hard since I have been challenging myself to “hard” tutorials over the past few months.  It was right on par with the projects I have been making and I have comfortably reached a new level in my jewelry making skills and that is an exciting thing!  Now I move the bar higher and the tutorials I look forward to trying when I am brave enough are some from the book Fine Art Wire Weaving by Sarah Thompson and the Complex Wire Wrapped Pendant Tutorial by IMNIUM.  The great thing is I can tell that at my current rate it won’t be too long until I am ready to at least try them…they might not turn out the nicest, but trying them is what I am talking about…mastering them is a different subject.  I am so thankful for the courage and confidence the Lord is building in me through this challenge.

There are many things to consider in making jewelry, but the two that I tend to stress over are making a piece look nice and how long it takes me to make a piece.  Occasionally there will be something I don’t like about a piece, but I am getting to the point that I am pleased with how most things turn out at this point.  That is a victory because I tend to be a perfectionist, however I am seeing improvement in my ability to give myself the grace I freely give to others which makes the creative process so much easier.

Because I want things to look really nice, it can take me a while to get the piece to look the way I want it to.  Time adding up can be stressful, especially if I want to sell the piece I am working on and not charge an exorbitant price for my time involved.  I have been trying to identify what takes the most time in order to try and be more efficient, if possible.  When I was working on the Egg Pendant this week I realized how much time I spend trying to make decisions.  It was actually quite surprising and a little ridiculous to realize how much time it can take me to make a decision, especially if I am not sure about it and then I can procrastinate about making the decision all the while trying to move onto the next step of the jewelry piece.

An example of this would be working out the curves  early on in the Egg Pendant.  I didn’t have an oval bead like the tutorial called for, so I used a round one that was close to the measurement of the oval bead.  The shape of the bead changed the shape of the pendant and required a lot of working with to get a look that flowed with the shape of the bead.  I ended up spending close to two hours of my time on this alone, but I was happy with the end result and it helped the rest of my pendant turn out well.  I have learned the importance of the placement of early parts of a wrap in relationship to later parts of a wrap.  I learned this through a few mistakes that couldn’t be fixed once I realized they needed it…because they were made early on in the project.

img_2074
Egg Pendant in progress…The curves and swirls at the bottom middle of the pendant are the places I messed with for a couple of hours.

So while it is important to take the time to make sure things are flowing and looking nice, I need to be careful that I don’t get sucked into the vortex of perfectionism, decision making, and procrastination.  I need to remember that it is okay to make a wrong turn and not freeze on making a necessary decision.  I think this will help me cut out a lot of the wasted time in a project overall.  I will also continue looking for ways to improve my timing and keep the good quality, but not lose the joy in creating.

Here are pictures of the completed Egg Pendant…

img_2103
Completed Egg Pendant
img_2104
Completed Egg Pendant

This week I also oxidized several pieces that I created over the past few weeks along with the new ball chain I got to turn my pendants into necklaces.  I am really excited how they all turned out!  I was also playing around with some chainmaille pieces, but I didn’t get them finished, so I will share them later.

Here are some pictures showing the oxidized pieces…

img_2107
Oxidized Bead Vase Pendant from Week Fifteen
img_2106
Oxidized Bead Vase Pendant from Week Fifteen
img_2080
Oxidized Wire Woven Bracelet from Week Fourteen
img_2082
Oxidized Wire Woven Bracelet from Week Fourteen (another angle)