This week has been different in a couple of ways. Normally, I follow a tutorial and create a piece or two of wire jewelry and then my husband will take beautiful photos for me to be able to share my pieces with you all here. I didn’t use a tutorial this week and I really don’t have a “finished” piece of jewelry. I made jump rings this week and I took all the pictures to document my journey as I made them. A jump ring is kind of a “behind the scenes” thing in most wire jewelry (with the exception of chainmaille…it is the star) but it is a necessary and helpful component and I needed some.
Shortly before I started this challenge I purchased different gauges of raw copper wire. I had used different plated and coated wires in all my projects before this challenge and I became frustrated with the quality of the wire I was using, so it was time for a change. I have made several pendants and other projects over the past fifteen weeks, but I have been using jump rings that I had made a couple of years ago with my plated wire. I decided it was time for me to have nice raw copper wire jump rings to match the projects I have been making and that is what I did for this week. I have some helpful tools that helped me create these jump rings. I use the Pepe Jump Ring Maker to create the different coils that I cut into different size jump rings and I use a Flex Shaft Motor to power the cutting handle in the jump ring maker set.
When I first started out this week, I didn’t expect it to be that hard, but I was in for a surprise. Like I said, it had been a couple of years since I made jump rings and I had forgotten all of the little tips and tricks I had learned to make my tools work properly. So, I needed to relearn a lot of things and I wanted to share those things here to help me remember and to help others who might need it. Here is the process I went through and the lessons I learned…
The first thing I did was figure out what size jump rings I wanted and how many of each coil I needed. This is one of the fun parts of the process. I like to make a large batch because the process as a whole can be quite messy and a little complicated.
Here is a picture of the wire coils I made…

The next thing I did was add cutting lube to each coil…it looks a bit like the coils needed some deodorant. 🙂

When I first started cutting the coils, I couldn’t get it to work right. One of the things I remembered is that I needed shorter coils, so I cut them all in half using my flush cutters…

Here is a picture of the base that I put the coils in to cut them…


There were many issues to be worked out before I finally got the jump rings to turn out properly. The main problem was the wire coils were being wadded up and not cut. It was quite frustrating. I had watched several youtube videos on it to see if I could figure out what I was doing wrong, but not much was helping. My husband helped me realize that I needed to turn the cutting base around which fixed some of the problems. Another problem was my blade, which I knew was on correctly, but I don’t think it was a very good blade and it actually broke into several pieces while I was trying to cut a coil which was kind of scary. I think it was at this point I was ready to throw in the towel and get a simple saw to make jump rings with. Here are some pictures of the mishaps…


It was at this point I finally remembered the tip that helped me the last time. In all of the videos and tutorials I watched and read they would talk about not tightening down the screws too tightly on the coils because the cutting blade would have a hard time cutting. Well “loosely” and “tightly” are relative terms here. I had mine way too loose because I didn’t want to squish the coils. I needed to tighten them up so there wasn’t any play in the lid and then it started cutting beautifully. I was so relieved when I found the right amount of tension needed.
Here is what a properly cut coil looks like…

With all of the initial drama over I knew now I just needed to do the work to cut and clean the jump rings. I have so many different sizes and gauges I was creating that I used baggies to help me keep them organized as I went.
Here is a picture of what I ended up with after the cutting part of this project…

Now it is time to clean these with the tumbler. I have a rotary tumbler and used steel shot and Shine Brite Burnishing Compound to clean them with. I ended up having four different loads to tumble so I could keep track of all the different jump rings without too many problems.
One thing I find handy when I am tumbling jump rings is to make sure to break up all the coils into individual rings or else the jump ring won’t be cleaned when it comes out of the tumbler.
Here is a picture of some coils that need separated…
I usually tumble a load of jump rings for about two hours and then I rinse them and let them air dry on a towel. When I remove a load the steel shot is mixed in with the jump rings.

I found that a heavy duty magnet will make it easy to separate out the steel shot.

After the jump rings are dry I put them in containers and mark what size jump ring it is and what gauge of wire it is made with. Here is a picture…

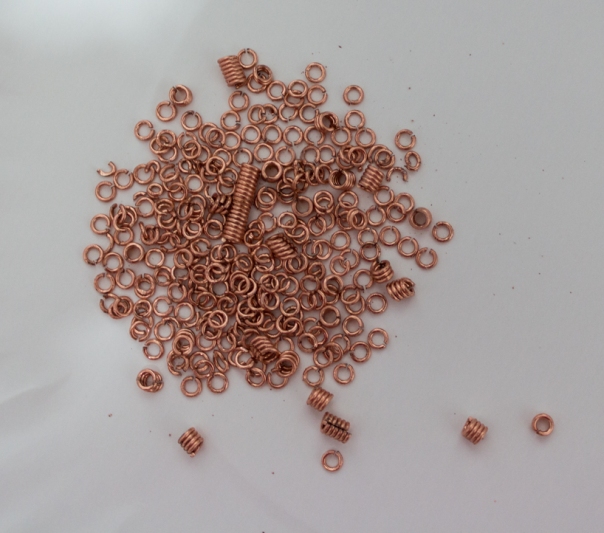
Here is a picture of all the jump rings I made this week…

Something I mentioned in passing is how messy this can be. I wear safety goggles and a mask while I am cutting so I don’t breathe anything in or get something in my eye. I also use lots of wet paper towels and throw-away rags to clean up with.
Here is a picture showing all the metal bits and dust that were created from cutting the coils…

I am really excited to have all of these nice jump rings to compliment the jewelry I am making. I am also excited that I can now make my own closed jump rings, but playing with my new soldering stuff will be a project for another week. There are a couple of chainmaille pieces I plan to use some of these jump rings on as well. There are many possibilities and I look forward to exploring them in coming weeks!
Here are some of the tips I learned or relearned this week…
~Make sure your blade is on right and that it is tight. (I noticed especially on the larger coils I had to tighten up my blade after a few cuts.)
~Make sure the top of the cutting base is snug against the coils, but not squishing them. You don’t want any play in the top.
~Don’t make the coils too big.
